FAQs
Questions answered in an understandable way
From iPIN to iPIN2
You can transfer the data from the older iPIN version to iPIN2 in two simple steps:
- Create an iPIN backup in the old iPIN version under Extras > Backup & Restore and then select Open in … iPIN2.
- In iPIN2 under More > Backup & Restore select the backup file imported in step 1 and restore this backup in iPIN2.
iPIN has been completely reimplemented. Beside the brand new look & feel, we’ve implemented some great new features:
- Completely redesigned iCloud Synchronization with a great WebApp on top
- Completely redesigned Air Synchronization (formerly WiFi Sync) based an Apple Bonjour
- Favorites
- Multitasking on iPad OS (no more fullscreen enforced … finally)
- Add Icons and Documents via Drag & Drop on iPad OS and macOS
- Password AutoFill under macOS
- Login with your Apple Watch under macOS
- More than 200 new flat build-in icons
- Edit existing fields (field name and field attributes)
- Edit documents in iPIN2
- Share Fields, Notes or a complete entries as text
- 1Password, KeePass and Enpass data Import
- Export your data in CSV file format
- CSV Import now also available unter iOS und iPad OS
- Create partial backups and restore backups into a group
- Spilt View on iPad and big iPhones
- Support for Landscape View on the iPhone
- Support for Dynamic Font Sizes
- New Setting: Show secure fields by default
For now there is no iPIN2 native Android or Windows Desktop App available but with the help of iCloud Synchronization, you can also access your data on Android and Windows devices. To do so, simply activate the iCloud Synchronization in iPIN2 for iOS, iPadOS or macOS and log in to our new iPIN2 WebApp with your Apple ID and the iPIN2 Login Password in your favourite browser.
No. Since we’ve made enormous changes to the internal data model, it is not possible to transfer the data from iPIN2 back to the older iPIN versions.
The iPIN2 Pro Features include the following features:
- Unlimited number of entries (without the iPIN2 Pro Features the number of entries is limited to 10)
- iCloud Synchronisation including Web Access (access your data on all devices and operating systems via browser)
- Air Synchronisation (Transfer your data over the air in your local network from one device to another.)
The iPIN2 Pro Features are available as an inexpensive annual subscription for only $4.99 per year including a two-week free trial period. The subscription only has to be purchased once and can be used on all your devices (iOS, macOS, iPadOS). The subscription is also approved for Apple Family Sharing, so that all members of the family (up to 6 persons) can use the subscription.
Like many other developers, we were forced to switch to a subscription model. The older iPIN version was over 11 years old and the maintenance and further development for operating system updates, new devices and the implementation of new features is very time-consuming and expensive – quite apart from the completely new reimplementation of iPIN2. Unfortunately, this effort cannot be met in the long term through pure “new customer business”.
In our opinion, subscription is an open and honest thing, as the user is not led to believe that the further development can be financed over the years with a one-time payment. To bring out new versions iPIN2, IPIN3 etc. every few years and to “ask the user to checkout” again and again with a one-time payment is basically just a “hidden subscription” in our eyes.
Compared to other providers, we are extremely cheap at $4.99 per year and we will remain so cheap – 1Password and many other providers charge this amount per month.
You can cancel your subscription at any time. How to cancel the subscription is explained in detail at the Apple Support
When you cancel your subscription, the iPIN2 Pro Features will remain available until the current subscription period expires. After the subscription period has expired, the iPIN2 Pro Features will no longer be available. Of course, you will still have access to your data and you will still be able to export your data in PDF- or CSV-Format – all this features are NOT part of the iPIN2 Pro Feature and will never be.
iPIN2 offers a convenient way to import data in CSV (Comma Separated Values) format.
Simply proceed as follows:
- Save the CSV file in the file system of your device.
- Open iPIN2 and select More > Import > CSV File.
- Configure the import processor (see configuration parameters below)
- Select Open CSV file to start the data import.
iPIN2 will import the data into a new Group – existing data will not be overwritten.
Important: Please make sure to delete the CSV file after the import, because the file contains unencrypted plain data!
CSV Import Configuration Parameters
You can configure the CSV import process with the following parameters:
| Parameter | Description |
|---|---|
| Field Delimiter | The field delimiter specifies how columns are separated within the CSV file. |
| Text Qualifier | A text qualifier is used to escape the field delimiter. For example if your field delimiter is comma and you want to import a note or field value which includes a comma, you have to use the text qualifier so that the comma within the text is not treated as a field delimiter. (Example: “This is a text including a comma , character”) |
| Note New Line | If you want to import notes with multiple lines, you can use the Note New Line character sequence in order to specify the new line within the note. (Example: “This is a note\nThis is the second line of the note”) |
| Encoding | The encoding specifies (what a miracle) the encoding of the CSV file. |
| Ignore First Line | Use this switch in order to ignore an optional header line within the CSV file. |
| Remove White Spaces | Removes any leading or tailing whitespaces from the imported values during the import process. |
CSV Import Format
The import format (i.e. the syntax = number of columns and the semantic = the meaning of each column) is fix. You have to create or transform your data into the expected format.
A single entry in iPIN2 can be (or must be) specified by multiple rows. For example if an entry contains two fields like a username and a password, the CSV file contains two rows for this entry in order to specify the two fields (see example below).
Each row must contain exactly eight columns separated by the field delimiter:
| Column | Content | Description |
|---|---|---|
| 1 | Group | Specifies the group name or group path. If there is no group name or group path given (the field is empty) the resulting entry will be imported into the root group. You can specify a simple group name like “My Group” or a group path like “My Group/My Subgroup” in case you want to specify subgroups. |
| 2 | Entry Name | The second column specifies the name of the entry. The name of the entry together with the group name or group path uniquely identifies the entry which is created or modified by this row. |
| 3 | Field Name | The name of the field in case the row specifies a field of an entry. |
| 4 | Field Value | The value of the field in case the row specifies a field of an entry. |
| 5 | Field Type | The following iPIN2 field types can be specified: username, password, pin, url, email, phoneNumber, accountNumber, routingNumber, iban, bic, swift, cardNumber, validUntil, cvc, customerNumber, licenseKey, passportNumber, ssn, hostname, port, userdefined If a field type is specified, the field name (column 3) will be ignored (the field name will be determined by the type). Use userdefined or just let the column empty in case the field does not match a predefined field type. |
| 6 | isSecure | true/false Use true in case the field value should not be displayed by default – otherwise use false or let the column empty. |
| 7 | isLink | true/false Use true in case the field value is a link (URL, phone number, email address) – otherwise use false or let the column empty. |
| 8 | Note | The note of the entry. If multiple notes are specified (multiple rows for the same entry) the notes are concatenated. |
All columns are optional which means all columns can be empty. Some examples:
- A row with seven delimiters like ,,,,,,, produces nothing but is valid.
- The row Empty Group,,,,,,, will create a group with the name Empty Group.
- The row ,Entry,,,,,, will create an entry in the root group with no fields and no note.
CSV Import sample file
The following sample CSV file with a header in the first line specifies some groups and entries which will be created during the import process. The sample should give you a better understanding of the required format.
CSV Import Limitations
It’s not possible to import binary data like icons or documents.
iPIN2 offers a convenient and easy way to import your data from 1Password.
Simply proceed as follows:
Export your data in 1Password in 1pif or 1pux file format.
Save the exported 1pif/1pux file in file system of your device.
Open iPIN2 and select More > Import > 1Password.
Select Open 1pif/1pux file in order to open the 1pif/1pux file and to start the data import.
iPIN2 will import the data into a new Group – existing data will not be overwritten.
While the 1pif export format only includes the entries, the 1pux export format also includes the documents and custom icons stored in 1Password.
Important: Please make sure to delete the 1pif/1pux file after the import, because the file contains unencrypted plain data!
iPIN2 offers a convenient and easy way to import your data from KeePass.
Simply proceed as follows:
Export your data in KeePass in KeePass 2.x XML Format.
Save the exported xml file in file system of your device.
Open iPIN2 and select More > Import > KeePass.
Select Open xml file in order to open the xml file and to start the data import.
iPIN2 will import the data into a new Group – existing data will not be overwritten.
Important: Please make sure to delete the xml file after the import, because the file contains unencrypted plain data!
iPIN2 offers a convenient and easy way to import your data from Enpass.
Simply proceed as follows:
Export your data in Enpass in JSON Format.
Save the exported json file in file system of your device.
Open iPIN2 and select More > Import > Enpass.
Select Open json file in order to open the json file and to start the data import.
iPIN2 will import the data into a new Group – existing data will not be overwritten.
Important: Please make sure to delete the json file after the import, because the file contains unencrypted plain data!
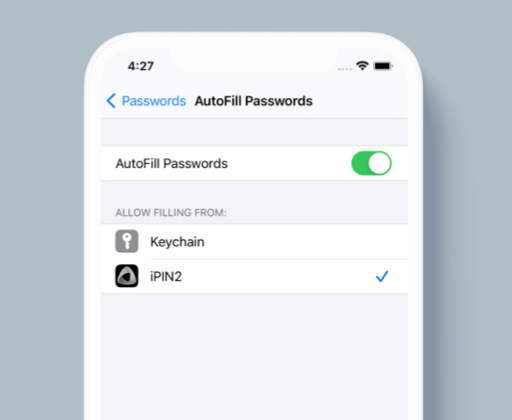
iOS and macOS have a great feature called Password AutoFill, which as the name implies automatically enters your username and passwords for websites and supported apps. After you have installed and setup iPIN2 on your device, you have to activate the iPIN2 Password AutoFill in the System Settings of your device.
On an iOS or iPadOS device:
- Open the System Settings of your device, swipe down and tap Passwords
- Tap AutoFill Passwords and turn on the switch next to AutoFill Passwords
- Select iPIN2 under ALLOW FILLING FROM
On the Mac:
- Open the System Settings
- Select Extensions
- Select Password AutoFill and enable iPIN2 for Password AutoFill

Once you have selected an entry in iPIN2 for Password AutoFill, the entry will appear in the QuickType bar above the keyboard the next time. In case you want to reset the QuickType bar, just disable and enable the iPIN2 Password Autofill in the System Settings.
All your data is encrypted with your individual iPIN2 Login Password. The iPIN2 Login Password is the key to access your data. In case you have forgotten the iPIN2 Login Password, there is not much you can do:
- In case you have setup a Password Hint, the hint will be displayed after you have entered a wrong iPIN2 Login Password.
- In case you can still login with the Sensor Code, Touch ID or Face ID, you can change the iPIN2 Login Password under More > Settings > Change Password without entering the old iPIN2 Login Password.
- In case you remember the Sensor Code but the Sensor Login is locked tue to too many failed attempts, you can try to restore the whole device with an Apple iTunes or iCloud device backup. Of course, the backup must have been created at a time when the Sensor Login wasn’t locked. Please notice that all data entered since the backup has been created will be lost (also regarding other apps than iPIN2).
- If a iPIN backup file is available and you remember the backup password, you can delete the app from your device and reinstall the app. After the setup is completed you can restore the backup.
- To use the app back to normal, you can delete the app from your device and reinstall the app. All data will be lost.
You can disable the Sensor Login in the iPIN2 Preferences under Preferences > Login Lock > Disable Sensor Login
The sensor keyboard provides an easy access to your private data without a complicated and time-killing password input.
You can touch the sensors with a finger (as with a regular keyboard) or you can swipe the sensors to activate/deactivate multiple sensors at once. You can activate/deactivate as many sensors as many times as you want.
A sensor is being activated with the first contact and deactivated with the second contact. What counts is not which sensors are activated at the end, but in which order you have activated/deactivated the sensors and how the sensors have been activated/deactivated (single touch or swipe).
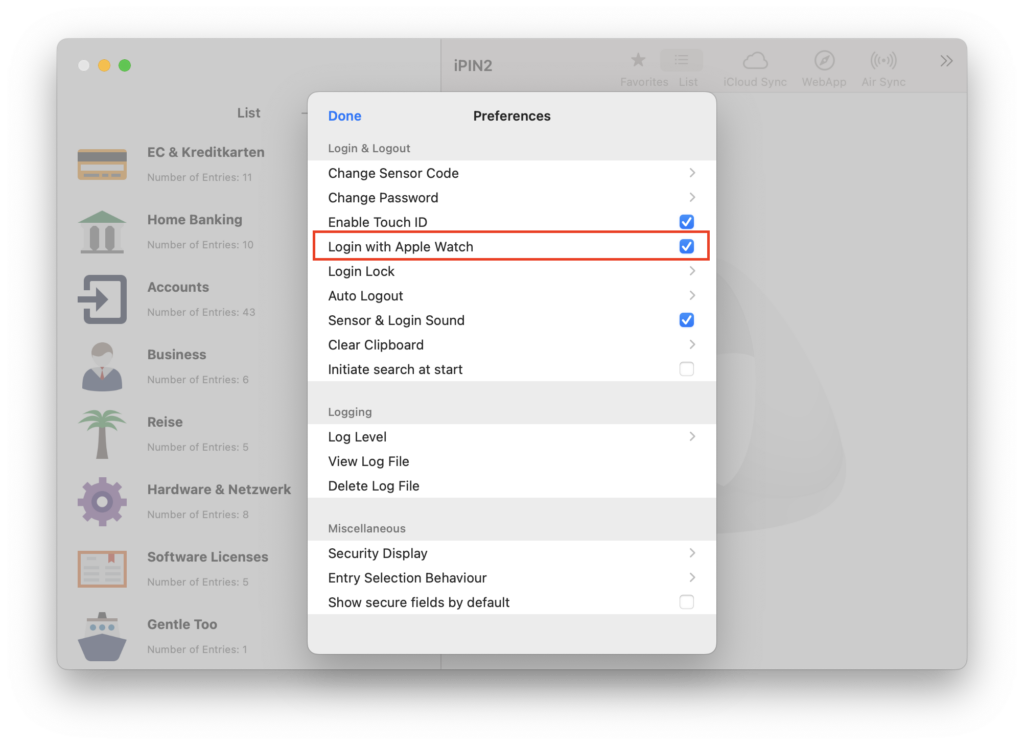
On your Mac you can also login with your Apple Watch. To do so please make sure that the option Use Apple Watch to unlock your applications and your Mac is enabled in the Mac System Settings under Touch ID & Password:
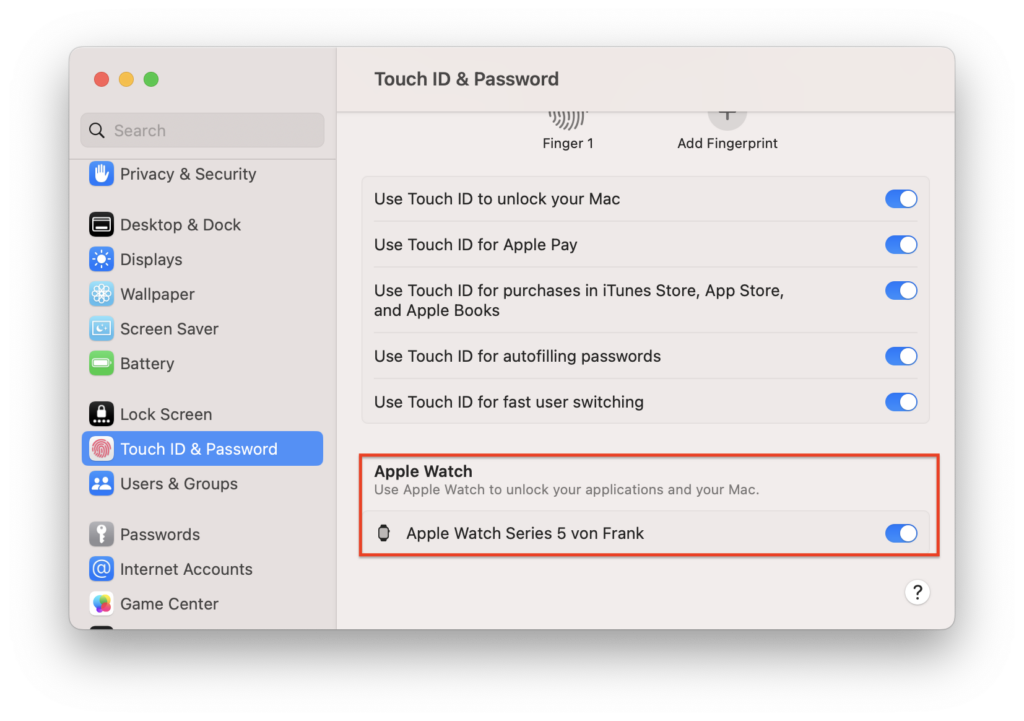
After that you can enable the option Login with Apple Watch in the iPIN preferences. Make sure to wear your Apple Watch while enabling this option.
In order to enable the iCloud Synchronization in iPIN2, the following requirements must be observed:
- The identical iCloud Account (Apple ID) must be configured on every device.
- iCloud Drive must be enabled in the system settings on every device.
- Within the iCloud settings, iPIN2 must have the permission to store data in iCloud.
- Since the data is encrypted with the iPIN2 Login Password, the iPIN2 Login Password has to be identical on every device.
The iCloud Synchronization has to be activated on every single device. Please make sure that all devices are connected to the internet via WiFi when you activate the synchronization the very first time.
We strongly recommend to create a backup before activating the iCloud Synchronization!
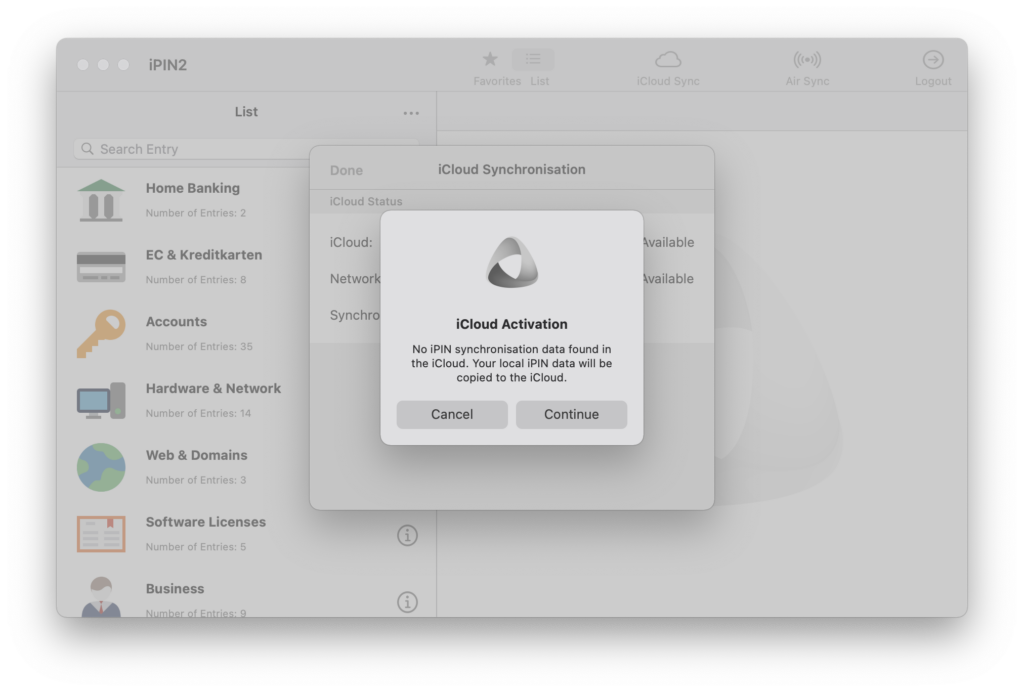
Activating the iCloud synchronization on the first device:
When you activate iCloud synchronization on your first device, a message appears that no synchronization data has been found in the iCloud. Click Continue to activate iCloud synchronization for your first device:
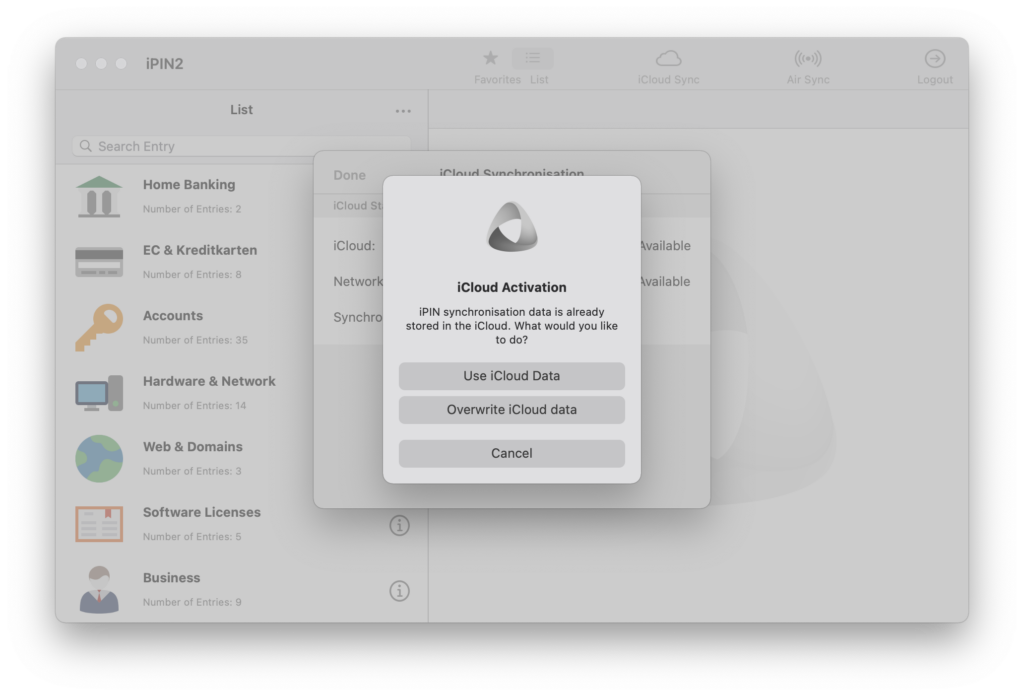
Activating the iCloud Synchronization on every additional device:
During the activation on every further device, a message should appear that synchronization data is already stored in iCloud. If NOT, please cancel the activation and wait until the first device has transfered the synchronization data to the iCloud and the data is available for the device.
You can choose whether you want to use the synchronization data in iCloud (your local data will be overwritten) or if you want to overwrite the synchronization data with your local data:
If you deactivate the iCloud Synchronization in iPIN2, you will be asked whether you want to delete the iCloud Data or not.
You can also delete the iPIN2 iCloud Data via the System Settings of a device under Settings > Apple ID > iCloud > Manage Storage > iPIN2 > Delete Data
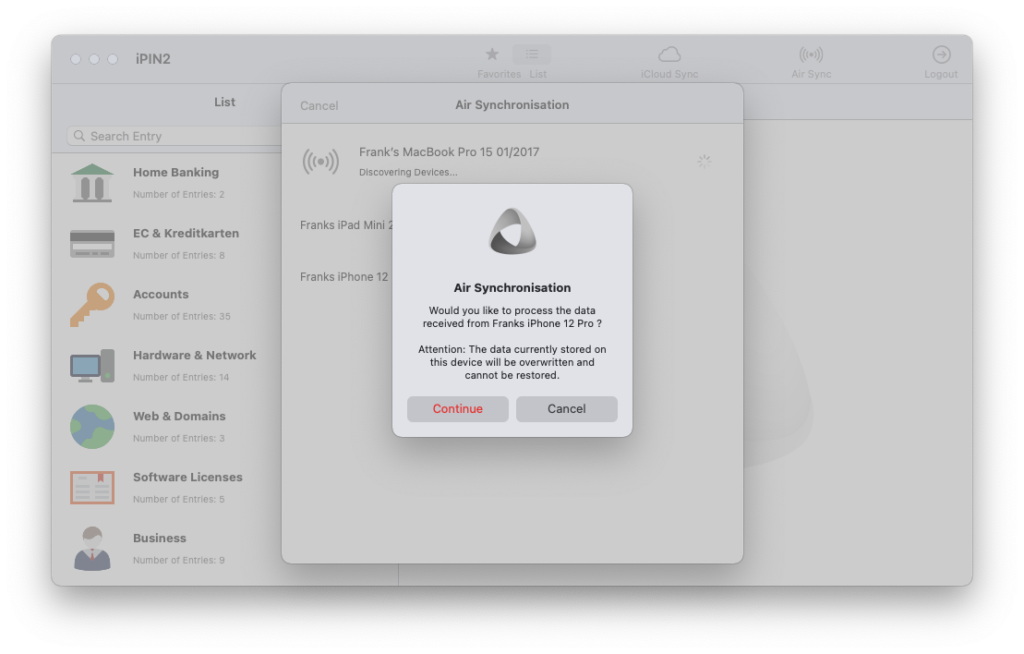
With the Air Synchronization you can transfer your data from one device to another in your local network. The iPIN2 Air Synchronization is based on Apple Bonjour and automatically detects the best and fastest way to transfer the data over the air in your local network including WiFi, Bluetooth and AirDrop. In order to use the iCloud Synchronization in iPIN2, the following requirements must be observed:
- Make sure that iPIN2 is allowed to access the Local Network (see System Settings > iPIN2 > Local Network)
- Make sure that WiFi and Bluetooth is enabled
- Since the data is encrypted with the iPIN2 Login Password, the iPIN2 Login Password has to be identical on every device.
- Start the Air Synchronization on all devices. As soon as the Air Synchronization starts, iPIN2 is discovering and listing other devices in the local network.
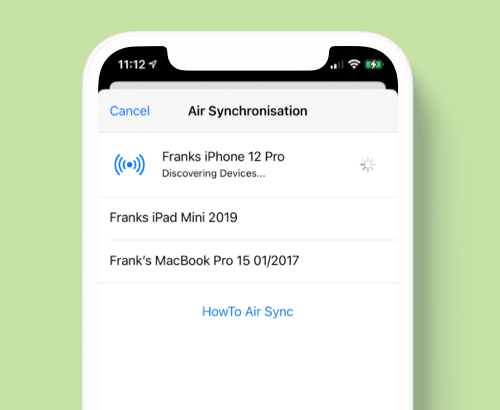
- On the source device – which means the device which data should be sent to another device – select the destination device.
- The data will be transferred to the destination device.
- After the data has been transferred from the source device to the destination device, you will be asked if you want to process the data from the source device. Select Continue in order to process the data.